9
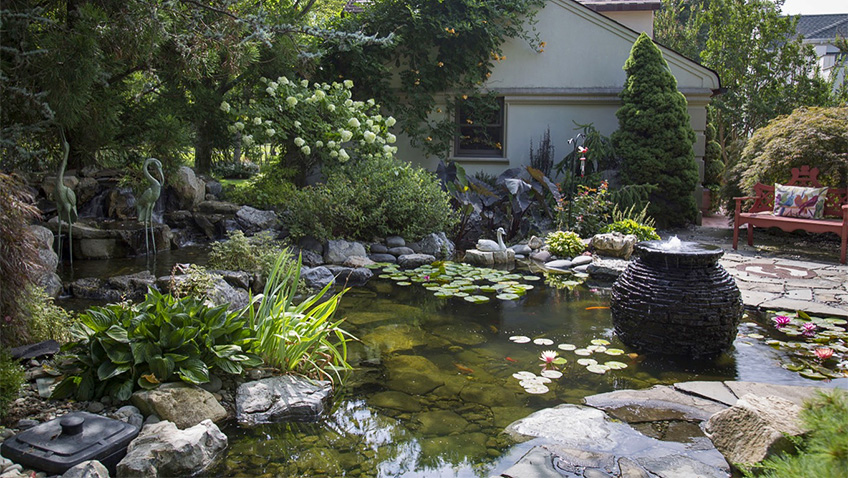
The presence of water fundamentally shifts the environment of a home landscape. Beyond visual appeal, moving or standing water masks urban noise, moderates microclimates through evaporative cooling, and creates a functional habitat for native pollinators, birds, and amphibians.
Building a water feature does not require commercial excavation equipment or professional masonry skills. With basic plumbing concepts, correct material selection, and deliberate site planning, homeowners can install reliable, low-maintenance fountains and ponds that operate efficiently for decades.
Choosing the Right Water Feature for Your Space
Before digging or purchasing materials, match the feature style to your yard dimensions, maintenance tolerance, and physical capabilities.
-
Container and Urn Fountains: Ideal for patios, small courtyards, or townhome yards. These self-contained recirculating systems use a submerged pump to push water through an upright vessel, spilling over into a subterranean reservoir hidden by decorative gravel.
-
Pondless (Disappearing) Waterfalls: A popular option for households with young children or pets. Water flows over natural stone drops into a gravel-filled underground basin rather than an open pool, virtually eliminating drowning hazards and deep-water algae blooms.
-
In-Ground Garden Ponds: Best for yards with ample space and level ground. These hold open bodies of water suitable for water lilies, marginal bog plants, and small cold-hardy fish. They require dedicated biological filtration and seasonal care.
Strategic Site Planning and Safety
A poorly located water feature quickly becomes an ongoing maintenance problem. Evaluate the installation site using three critical factors:
-
Overhead Foliage: Avoid placing ponds directly under large deciduous trees. Falling leaves, seed pods, and pine needles introduce massive organic loads that decompose into toxic ammonia and foul the water. Tree roots can also puncture pond liners or heave rigid basins over time.
-
Sunlight Exposure: Balance sunlight based on your intended goals. Garden ponds require five to six hours of direct sunlight daily if you want flowering water lilies. However, full-day summer sun drives aggressive single-celled algae blooms (pea soup green water). Morning sun with afternoon shade provides the ideal thermal balance.
-
Proximity to Utilities: Always call 811 before excavating to mark underground electric, gas, and communications lines. Your feature needs access to a dedicated exterior GFCI (Ground Fault Circuit Interrupter) electrical outlet. Never run a permanent water pump from a residential extension cord.
Building a Disappearing Urn Fountain: Step-by-Step
A disappearing fountain is the easiest structural water feature for a beginner. Because water remains subterranean, the system stays cleaner, evaporates slower, and requires minimal chemical balancing.
Required Materials and Tools
-
Heavy ceramic, concrete, or resin urn with a central drainage hole
-
15-to-30 gallon rigid water basin or heavy-duty plastic storage tub rated for burial
-
Galvanized steel mesh or heavy-duty basin support grate
-
Submersible magnetic-drive water pump (rated between 250 and 500 GPH)
-
0.75-inch flexible vinyl or kink-free PVC tubing
-
Ball valve (to dial in water flow rate)
-
Non-toxic silicone sealant or marine-grade plumbers putty
-
River pebbles or washed basalt rock
-
Shovel, torpedo level, utility knife, and tape measure
Installation Process
-
Excavate the Reservoir Hole: Dig a hole slightly wider and two inches deeper than the basin container. Tamp the soil flat and verify it is level across both axes. Add a one-inch layer of masonry sand to create a smooth, unyielding base.
-
Seat the Reservoir: Place the tub inside, checking that the top lip sits roughly one inch above the surrounding ground grade. This elevation stops muddy surface runoff from pouring into the water during heavy rain. Backfill dirt around the perimeter, tamping firmly as you fill.
-
Plumb the Basin: Position the submersible pump inside the basin base. Connect the flexible tubing to the pump outlet, splicing the inline ball valve into the line so you can throttle water output. Run the power cord through the basin’s electrical access cutout.
-
Reinforce the Cover: Cut your support grate to sit flush on top of the basin. If using a custom grate, reinforce the span using angle iron or treated dimensional lumber positioned underneath to distribute the heavy weight of the rock and filled urn.
-
Set the Urn: Run the plumbing tubing through the center hole in the grate, up into the bottom of the urn, and up to the top rim. Seal around the plumbing pipe at the urn base with marine silicone to prevent unwanted back-siphoning.
-
Dress and Test: Fill the underground basin with water until the pump intake is completely submerged. Plug the pump into your GFCI outlet and turn the ball valve until the water wells up gently over the rim. Cover the exposed grate with rounded river pebbles to mask all mechanical components.
Constructing an In-Ground Ecosystem Pond
An ecosystem pond relies on natural biological cycles to maintain water clarity rather than commercial algaecides. It incorporates three primary tiers: shallow marginal shelves for plants, a deep central zone, and continuous mechanical and biological water filtration.
Materials and Equipment
-
45-mil EPDM fish-safe rubber pond liner
-
Non-woven geotextile underlayment fabric
-
Submersible pond pump (sized to turn over pond volume once every hour)
-
Mechanical skimmer box (collects floating surface debris)
-
Biological waterfall filter (houses beneficial bacteria media)
-
Flexible PVC pipe and heavy-duty primer/cement
-
Fieldstone, granite boulders, and smooth river rocks of assorted sizes
Step 1: Excavation and Tiering
Mark the pond outline using an ordinary garden hose or spray paint. Dig the pond in progressive tiers:
-
First Tier (Marginal Shelf): Dig down 8 to 10 inches around the inner rim. This shelf holds emergent plants like rushes and irises.
-
Second Tier: Step inward 12 inches and dig down to an 18-inch depth.
-
Deep Zone: Step inward again and dig the center out to a minimum depth of 24 to 36 inches. In regions with freezing winters, an absolute minimum depth of 30 inches ensures fish survive under the surface ice layer.
Use a level on an eight-foot board to ensure the perimeter edges are dead level all the way around. An uneven rim forces water to spill out on the low side before the pond reaches its proper fill level.
Step 2: Underlayment and Liner Placement
Clear the excavation floor of all sharp roots, glass, and stones. Lay non-woven geotextile underlayment across the excavation, pulling it smooth up the tiered shelves. The underlayment shields the rubber membrane against punctures from shifting subsoil.
Center the 45-mil EPDM liner over the hole and drop it in loosely. Do not pull it taut. Instead, work the rubber into the contours of the steps and floor, creating neat, small pleats along corners. Leave at least two feet of excess liner extending beyond the outer banks.
Step 3: Rock Placement and Mechanical Integration
Anchor the liner inside the excavation using rocks starting from the deepest point and working upward:
-
Place large boulders along the vertical shelf walls to support the soil structure.
-
Spread smaller two-to-four-inch river gravel over horizontal flat shelves to protect the rubber from UV degradation and give plant roots an anchoring substrate.
-
Install the mechanical skimmer on the prevailing downwind side of the pond and the waterfall spillway at the opposite end to guarantee cross-pond circulation.
-
Run flexible PVC from the skimmer pump to the biological waterfall filter box located at the head of the stream.
Step 4: Filling and Edge Finishing
Begin filling the pond with fresh tap water. The increasing weight of the water will stretch and settle the liner tightly into the shelf contours.
Once the pond is full, fold the excess liner back and cover the perimeter edges with overlapping flagstones, flat boulders, and plant beds. Ensure the edges sit safely above the lawn grade to eliminate the risk of pesticide or fertilizer contaminated runoff entering the system.
Maintaining Water Quality and Hardware
A balanced water feature demands consistent, simple habits rather than heavy chemical treatments.
-
Managing Evaporation: All outdoor features lose water to evaporation and wind drift. In hot weather, you may lose one to two inches of depth weekly. Top off with city tap water in modest volumes, or add an automatic mechanical float fill valve.
-
Chlorine and Chloramines: Municipal water carries chlorine and chloramines that destroy the beneficial bacteria inside biological filters and burn the gills of fish. Add a liquid pond detoxifier or sodium thiosulfate conditioner every time you top off more than ten percent of total volume.
-
Winterizing Systems: If you live where ground freezes solid, unplug pumps before ice forms. Pull the pump, submerge it in a bucket of clean water in a heated garage or basement, and drain all exterior plumbing lines. Run a small floating de-icer or air aerator in garden ponds to keep a small hole open in the surface ice for biological gas exchange.
Frequently Asked Questions
What causes a sudden drop in water level besides a direct leak in the liner?
The most common cause is capillary action caused by debris or plants. Long string algae, watercress, or moss growing along the perimeter edges can drape over the outer stone rim and act as a siphon, constantly draining gallons of water an hour into the surrounding soil. Wind drift catching water from a tall spillway or fountain head can also strip substantial water volume on breezy days.
Can water features be powered exclusively by solar pump units?
Yes, but solar pumps carry performance trade-offs. Small solar-powered fountain pumps work well for standalone birdbaths or lightweight urns during daylight hours. However, in-ground ecosystem ponds require nonstop, twenty-four-hour circulation to keep the beneficial bacteria in biological filters alive. A pure solar system for a standard pond requires an expensive deep-cycle battery bank and an oversized photovoltaic array.
How do I stop mosquitoes from breeding in standing or slow-moving water?
Continuous water agitation is the most reliable physical deterrent, as mosquito larvae cannot reach the surface to breathe through ripples. For calm water, edges, or bog zones, use Mosquito Dunks or bits containing Bacillus thuringiensis israelensis (BTI). BTI is a naturally occurring, safe bacterium that destroys mosquito larvae without harming birds, pets, fish, or aquatic plants.
Which types of rock should never be used inside an outdoor water feature?
Limestone, marble, and soft sandstones should be avoided. These sedimentary rocks contain high concentrations of calcium carbonate, which slowly dissolves in water, driving the pH upward to alkaline levels dangerous for fish and explosive for filamentous string algae growth. Stick to inert, non-reactive igneous or metamorphic stones such as granite, slate, basalt, and fieldstone.
How much electricity does an average backyard pond pump consume each month?
Submersible magnetic-drive pumps are extremely energy-efficient compared to older asynchronous electric motors. A typical 1,000 to 2,000 GPH pump draws between 60 and 150 watts of electricity, comparable to a pair of traditional incandescent light bulbs. Operating this pump continuously usually adds roughly five to fifteen dollars per month to a residential electric bill, depending on local kilowatt-hour utility rates.
Can ordinary house paint or sealers be used to water-seal a porous terra cotta fountain urn?
Standard latex and oil paints will flake away when exposed to continuous moisture immersion, releasing toxic synthetic chemicals into the water. If you are sealing a porous clay or terra cotta vessel, use a drinking-water-safe epoxy coating or a fish-safe liquid rubber sealant labeled explicitly safe for potable water reservoirs and marine biology.
What is the purpose of adding gravel directly over the pond liner floor?
A layer of rounded gravel shields the rubber EPDM liner from ultraviolet radiation, which degrades unprotected rubber over years of exposure. It also serves as a massive biological matrix, offering billions of microscopic surfaces where aerobic bacteria colonies establish to digest excess nutrients, fish waste, and microscopic organics.
